Fundamentals
A complete perspective of performance in one place.
Fundamentals looks at 20 critical financial analysis ratios in 5 different categories: Growth, Profit, Cash Flow, Key Ratios, and of course, Earnings. 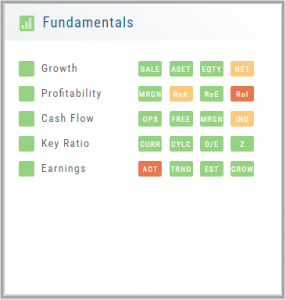
We also take into account Quarter over Quarter, Year over Year, and Trailing Twelve Months’ (TTM) performance with our proprietary weighting formula. View historical data by clicking on the upper right corner buttons in each window.
Fundamentals is the slowest of The Score components to affect stocks, due to the limited times throughout the year data is released. Active investors would generally place more weight on Fundamentals than would a very short-term trader.
Trade Management
This platform makes it easy to manage and adjust trades when needed. The Snapshot feature and the P/L graph enables you to visually assess adjustments.
Once the existing trade is showing on the options page, take a ‘snapshot’. Enter the adjustment, then take another ‘snapshot’.
To submit the adjustment to the Order Ticket of your brokerage account, click “Trade”. The smart ticket system will even handle the trade adjustment automatically by entering the appropriate buy/sell, open/close combination. 
Rolling Positions
It’s easier & faster to evaluate your Trade
Once you have entered a position, you can easily make adjustments for further evaluation using the group of Rolling Icons in the upper-center part of the Option Table.
These icons will allow you to move the whole position: 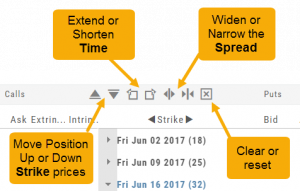
Up or Down Strike Prices
Extend or Shorten Time
Widen or Narrow the Spread
The [X] acts as a clear function. Clicking once will clear the current positions in the chain. Clicking a second time will act as “all clear”. This will clear any snapshot trades and fully reset the option chain.
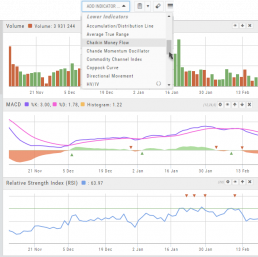
Lower Indicators
The “Add Indicator” drop-down box has a section of Lower Indicators you can add below the main chart.
Many of the Indicators allow you to customize the parameters prior to adding.
Once the Indicators are in place, the icon tool bar – found on the upper right above each graph- gives you the ability to edit (Gear), hide (Eye), move up/down (Arrows) or delete (X) to truly customize your view.
![]()
Elements of the Template
The Trade Finder Templates are designed to allow you to ‘visually trade’.
When evaluating a position, a Bull Put for example, the template automatically sets up the trade. You can use the rolling icons to adjust the position: Roll the position up/down, roll out the time frame, adjust the strikes, etc. You can even adjust the Net Credit(Debit) of the trade in an attempt to get a more favorable entry cost/credit.
The Performance Channels show the profit/loss of the position.
The P/L summary at the bottom left of the screen shows the Risk/Reward ratio, Net/Total Credit (Debit),the break-even stock price point, the max reward/max risk with corresponding stock price.
A snapshot on the right side of the screen, provides a visual structure of the strategy, what market 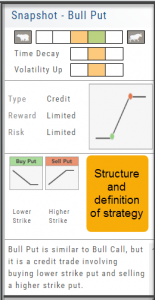 conditions are favorable to the trade, whether volatility and/or time positively, negatively or is neutralized by the strategy.
Greeks and Volatility are also shown.
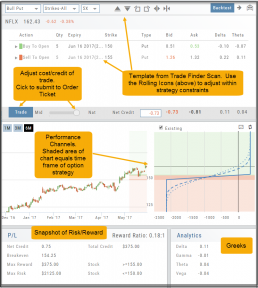
Once satisfied with the position set-up, click ‘Trade’ and the order will auto-fill in the “Order Ticket” of your brokerage account.
Important! While adjustments may to the template may be made, the system limits what can be changed in order to stay within the constraints of the strategy. This safety measure ensures you stay in the type of trade you intend to be in.
Adding & Arranging Indicators
Select ![]() to add to your studies.
to add to your studies.
Indicators are grouped by Upper Indicators (which will appear on the Chart) and Lower Indicators (listed below the chart)
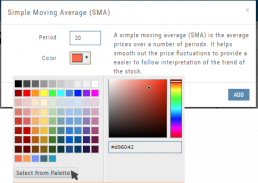
Once selected, you can customize the parameters – including the type of line you want for Moving Averages.
The upper Indicator selection summary appears above the chart and has an associated toolbar that allows edits (gear) hide/display(eye), refresh, or remove.. ![]()
Lower indicators can be displayed/hidden, move placement up/down, or delete it to truly customize your view. ![]()
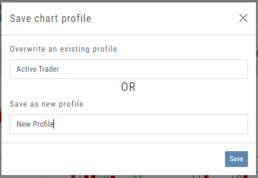
Make sure to Save Your New Chart Settings ![]()
Note: You cannot alter System Views: Active Trader, Options or Standard View. You will be prompted to either Overwrite or Save as a New Profile another available profile, such as Default or another Personal View.

Historic & Implied Volatility
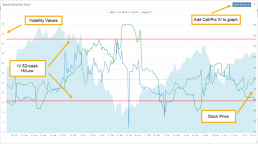
This chart displays Historic (HV) and Implied (IV) Volatility with the ability to overlay Call/Put IV
Historic Volatility (green line) is based on how the stock actually moved.
Implied Volatility (blue line) is based on how the options are priced.
When expanded, the stock chart, 12-Month Mean (Average) IV and one-year IV High/Low (red line) are also shown. This is very helpful in understanding if option premiums are comparable to historic values.
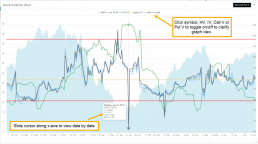
High HV indicates recent strong movement.
High IV indicates higher premium and, in many cases, anticipated movement.
Note: You can remove the Stock Chart, HV, IV or Call/Put IV simply by clicking on the corresponding indicator above the chart/graph.
Entering a Position
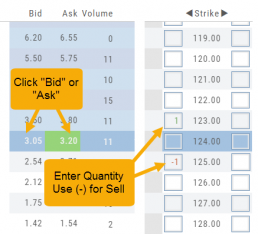
You can enter a position to analyze by clicking on ‘Ask’ for buying or ‘Bid’ for selling. You can also directly enter the quantity in the entry box. (Note: make sure to indicate a selling position with a minus (-) sign).
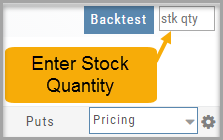
For positions that include the underlying stock, such as Covered Calls, Protective Puts & Collars, enter the stock quantity in the upper right corner of the chain window.
You can change the click quantity amount by changing the default-click parameter (found at the top of the Option Table) for 1x, 5x or 10x.
Customizing Indicators
Customize Indicator Settings – even in different Chart Profiles!
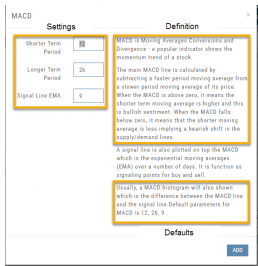
Customize the settings by clicking on the “Add Indicator” box at the top, center of the screen. Scroll to the Indicator you wish to add/edit. Left-click on the selection for a customization box to appear.
The Indicator window shows which settings can be changed.
Bonus! You can save different settings for the same indicator in different chart profiles. No need to change settings from one profile to the next.
In addition to the settings, this feature also provides a description of the indicator and the default settings.
Where are the Greeks?
You may come across instances on the Options Chain where Delta, Gamma, Theta & Vega fields are blank.
This occurs when the Extrinsic Value of the Option Strike Price is Negative. Negative numbers cannot be used to calculate the sensitivity of an option’s price underlying stock price changes, changes in volatility and passage of time.
Some platforms may place a ‘0’ (zero) vs. keeping the field blank. This is not entirely accurate, as ‘0’ is a valid number


